
Operation of High-pressure Reactor Vessels
Przegląd
Robert M Rioux, Pennsylvania State University, University Park, PA
The use of gases in a synthetic chemistry laboratory is essential for carrying out a variety of highly facile and atom economical transformations. Reactions such as hydrogenation, oxidation, and amination require the use of gases like hydrogen, oxygen, and ammonia. Due to the poor solubility of these gases in typical reactant solutions, high pressures are necessary to achieve a meaningful reaction rate. Not only are these gases highly reactive, the use of high pressures makes these operations fairly hazardous. The biggest challenge in the use of high pressure is the containment of the high-pressure gas for the entire duration of the reaction, with close monitoring of the pressure and temperature, to avoid the formation of explosive mixtures and runaway reactions.
These reactions are typically carried out using thick-walled pressure vessels. The pressurized vessel allows for operation at high pressure with appropriate safety concerns abated. Figure 1 demonstrates the various parts of a typical pressure vessel, used to conduct high-pressure reactions. The following protocol highlights the procedure for the safe operation of these high-pressure reactor vessels.
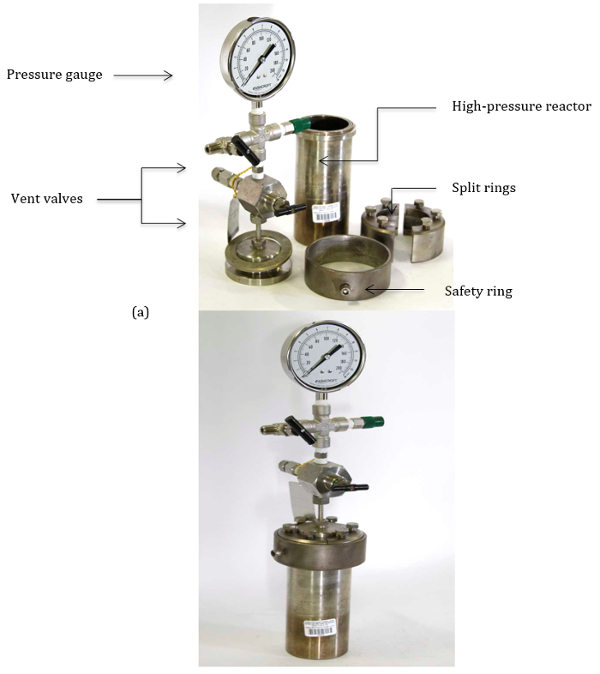
Figure 1. (a) Parts of the high pressure reactor vessel. (b) Assembled high pressure reactor vessel.
Procedura
The operation of the high-pressure Parr reactor (or equivalent) can be roughly broken down into 3 steps.
1. Charging
- Select an appropriate secondary reaction vessel based on the scale of the reaction. Test tubes, Erlenmeyer flasks, or round-bottom flasks are some examples of appropriate reaction vessels. Make sure to keep enough head space above the solvent level in the flask as the solvent tends to bubble up during pressure venting.
- Place the reactants, along with a stir bar, in the reaction vessel and place it in the high-pressure reactor.
- Place the pressure gauge assembly on the top of the reaction vessel. Make sure the vent valve is completely closed. Turn it clockwise to finger tight. Do not overtighten.
- Assemble the split rings on the vessel.
- Start tightening the diagonally opposite screws on the split rings, but do not tighten them all the way. This is to ensure that the pressure exerted by the gauge is even across the vessel.
- Tighten all screws completely.
- Place the safety ring on the bench, and place the reactor in the ring.
- Slide the ring up to the split rings, and align the screw with the dent on the side of the split ring.
- Finger tighten the safety ring.
- The vessel is now ready for the next stage.
2. Purging and Pressurizing
- Attach the pressurized gas source to the reactor and turn on the main valve on the regulator.
- Set the pressure to approximately 1/3rd of the final required pressure.
- Slowly open the vent valve on the pressure gauge and pressurize the reactor.
- Now close the main valve on the gas regulator.
- Slowly loosen the pressure line going in to the reactor, so that the pressure in the reactor starts to fall. Make sure the reactor is in a well-ventilated area.
- Once the pressure falls back to zero, tighten the pressure line again, and open the main valve on the gas regulator.
- Adjust the pressure to 2/3 of the final required pressure and repeat steps 3-6 above.
- Now adjust the pressure on the regulator to the final desired value and pressurize the reactor.
- Once the final pressure is reached, close the vent valve on the pressure gauge, and close the main valve on the gas regulator.
- Carefully loosen the pressure line, so that the gas in the line and the regulator is vented.
- Always set the outlet pressure on the gas regulator back to zero (this usually means loosening the pressure control valve). This ensures that gas will not leak, even if the main valve on the regulator is turned on by accident.
- Now place the reactor in a hood and let the reaction run for the desired amount of time. The reactor can be heated if desired. Ensure the temperature is below the rated limit of the vessel.
3. Venting
- Once the reaction time is over, cool the reactor to room temperature, if necessary.
- Now slowly open the vent valve on the gauge to vent the gas from the reactor. Do this as slowly as possible to prevent the solvent spilling over in the reactor. Crucially, make sure the reactor is in a fume hood.
- Once the pressure in the reactor drops to zero, loosen the safety ring and the screws on the split rings.
- Disassemble the split rings and remove the gauge from the reactor.
- Remove the reaction vessel from the reactor.
- Once the reaction vessel is removed from the reactor, rinse the reactor with water and then acetone and leave it open to dry.
Wniosek i Podsumowanie
The manipulation of gases at high pressure can be done with the use of a Parr reactor (or equivalent) vessel. Proper safety precautions should be observed while operating these vessels as they present an explosion hazard.
Przejdź do...
Filmy z tej kolekcji:

Now Playing
Operation of High-pressure Reactor Vessels
Lab Safety
16.1K Wyświetleń

Proper Personal Protective Equipment
Lab Safety
233.0K Wyświetleń

Emergency Eyewash and Shower Stations
Lab Safety
82.3K Wyświetleń

Electrical Safety
Lab Safety
41.9K Wyświetleń

Working with Centrifuges
Lab Safety
95.6K Wyświetleń

Working with Hot and Cold Sources
Lab Safety
41.4K Wyświetleń

Guidelines in Case of a Laboratory Emergency
Lab Safety
181.6K Wyświetleń

Chemical Storage: Categories, Hazards And Compatibilities
Lab Safety
108.3K Wyświetleń

Safe Handling of Mineral Acids
Lab Safety
44.7K Wyświetleń

Handling Chemical Spills
Lab Safety
87.3K Wyświetleń

Proper Use of Autoclaves
Lab Safety
87.4K Wyświetleń

Fume Hoods and Laminar Flow Cabinets
Lab Safety
68.5K Wyświetleń

Handling Air- and Water-Sensitive Chemicals Using a Schlenk Line
Lab Safety
21.9K Wyświetleń

Proper Operation of Vacuum Based Equipment
Lab Safety
15.8K Wyświetleń

Operating the Glovebox
Lab Safety
28.6K Wyświetleń
See More
Copyright © 2025 MyJoVE Corporation. Wszelkie prawa zastrzeżone