Comprehensive Breast Exam
Genel Bakış
Source:
Alexandra Duncan, GTA, Praxis Clinical, New Haven, CT
Tiffany Cook, GTA, Praxis Clinical, New Haven, CT
Jaideep S. Talwalkar, MD, Internal Medicine and Pediatrics, Yale School of Medicine, New Haven, CT
Breast exams are a key part of an annual gynecological exam and are important for all patients, no matter their sex or gender expression. One out of every 8 women will be diagnosed with breast cancer; male breast cancer, though less common, has a lifetime incidence of 1 in 1000.
Breast exams can feel invasive to patients, so it is important to do everything possible to make the patients feel comfortable and empowered, rather than vulnerable. Examiners should be aware of what they are communicating, both verbally and non-verbally, and give their patients control wherever possible (for instance, always allowing them to remove their own gowns). Examiners may choose to utilize chaperones for the patients' (as well as their own) comfort. Some institutions require the use of chaperones.
While it is always important to avoid overly clinical language, certain colloquial words can cross the line from caring to overly intimate in this exam. It is helpful to avoid the words "touch" and "feel" in this exam, as this language can feel sexualized. Instead, use words like "assess," "check," or "examine."
Additionally, the best practice dictates avoiding assumptions about patients' gender, as patients with female anatomy may identify as another gender (e.g., transgender, genderqueer, etc.). This video depicts the approach to patients whose history has revealed no specific complaints or risk factors related to breast health.
In order to avoid missing potential findings, the breast exam should be performed in a systematic approach and consist of three main components: visual inspection of the breast tissue, palpation of the lymph nodes, and palpation of breast tissue.
The breast tissue extends from directly under the clavicle to around the fifth rib (or bra line). Laterally, it extends from the midaxillary line to the sternal border. The breast is viewed in four quadrants; the upper outer quadrant has the most tissue and is the location of many lymph nodes, and the tail of Spence (or axillary tail) extends to the edge of the axilla, where it attaches to the chest wall (Figure 1).
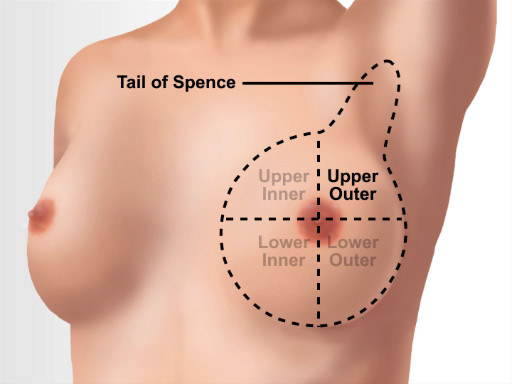
Figure 1. Breast anatomical landmarks.
Prosedür
1. Preparation
- Before beginning the breast exams, establish an expectation of comfort, and ask the patient to communicate questions and concerns during the visit. For example, say something like, "Have you had an exam like this before? How was that experience for you? I expect this to be a comfortable exam. If there is anything I can do to make this more comfortable for you, please let me know and I will make any adjustments I can. You may ask me questions at any time."
- Clean your hands. Some practitioners choose to perform the manual portions of the exam with gloves for the sake of the patient's (or their own) comfort. If an examiner has any doubts, then it is better to wear gloves, as a patient can pick up on any anxiety, which may make them feel uncomfortable.
2. Introduce the exam
- Introduce and summarize the three parts of the exam for the patient: "I'm going to perform a breast exam. First, I will have you do some arm movements so I can check how your breast tissue moves. Then I will check some lymph nodes in your underarm area. Last, I will use the pads of my fingers to assess your breast tissue."
- With the patient seated on the exam table, ask the patient to lower the gown to the waist.
3. Visual exam
During this exam, visually observe and assess all of the breast tissue, both still and in motion. To establish if something is normal or a recent change (more concerning) for a patient, ask, "Is this normal for you? How long has it been like this?" Document any findings.
- Visually inspect the breast tissue while the patient remains still. Assess for redness, scaly skin, visible lumps, spontaneous discharge, moles, inverted nipples, and dimpling. Also assess for potential signs of domestic violence and trauma: bruises, burns, bite marks, scars, etc. Indicate marks and ask, "Can you tell me more about how this happened?"
- Visually assess the breast tissue in motion. All parts of the breast tissue should move freely, away from the chest wall. Again, no tissue should appear to dimple or retract.
- Ask the patient to slowly raise arms above the head, then clasp hands and push them together, and then slowly lower arms to the sides.
- Stand to one side of the patient and offer your arm, palm down, for support. Ask the patient to lean forward, and observe the side of the breast tissue as the patient leans.
- When the patient is fully forward, place a hand mirror under the patient's breast, angled to see the skin and tissue on the underside of the breast.
- Ask the patient to sit back, angling the mirror as the patient moves to observe how the lower breast tissue moves.
- If the patient has pendulous breasts and it's difficult to see all the skin underneath, ask the patient to lift the breasts so you can assess the skin.
- Ask the patient to place hands on the hips, then roll the shoulders forward. Observe how the tissue moves; then perform the first step of the lymph node exam.
4. Lymph node exam.
- Assess the supraclavicular lymph nodes. Use your index and middle finger of each hand to hook over the patient's collarbone, and use a circle-slide motion to palpate for the supraclavicular nodes, checking both sides at once.
- Assess the axillary lymph nodes. Ask the patient to put the gown back on, leaving the right shoulder uncovered for examination, and rest the patient's right forearm on your shoulder.
- To assess the central nodes, use the index and middle fingers of your right hand to push up and under the fatty tissue toward the apex of the axilla, and press firmly against the upper thoracic wall (which feels like a large, curved bone). Let the patient know that some pressure may be felt.
- From there, palpate down the midaxillary line to the fifth rib. Drag your fingers across the skin between palpations, rather than lifting your hand, to assess the most superficial layer of tissue, and ensure no area is skipped.
- Ask the patient to make a fist in order to view the line between the biceps and triceps. Ask the patient to release the fist, and then palpate the brachial chain using two fingers of your right hand.
- Place the index, middle, and ring fingers of your left hand behind the pectoralis muscle, and place your right hand on the front of the chest to brace the tissue and assess the pectoral lymph nodes. Apply anterior pressure with your left hand while moving it up and down in a windshield-wiper motion to assess the tissue and nodes.
- Place the index, middle, and ring fingers of your right hand in front of the teres major muscle, and place your left hand on the patient's back to brace the tissue and assess the subscapular lymph nodes. Apply posterior pressure with your right hand while moving it up and down in a windshield-wiper motion to assess the tissue and nodes.
- Repeat on the patient's left side. Use the opposite hand for each previous step.
5. Clinical breast exam.
There are a few well-accepted methods for the breast exam (Figure 2). All of these methods use a systematic approach to ensure all breast tissue is examined: concentric circle or spiral, vertical strip or linear, and radial spoke or wedge. The vertical strip exam (demonstrated in this video) has the most supporting data. Regardless of the method used, the palpation technique is the same.

Figure 2. Different patterns for clinical breast exam.
- Ask the patient to recline on the examination table in the supine position. Pull out the foot shelf.
- Ask the patient to roll away from you and onto the side. Place a pillow behind half of the patient's back before asking to patient to lie flat again. Ask the patient to lower gown on the side closest to you, and raise one arm overhead.
- Begin the exam at the top of the midaxillary line. Using the pads of three fingers in a circle-slide motion, palpate in circles roughly the size of a quarter to assess for masses.
- While palpating, spiral down through three levels of pressure: superficial, medium, and deep (reaching the chest wall). Healthy breast tissue may feel lumpy, including fatty tissue, lobules, fibrocystic changes, the inframammary ridge, and lymph nodes. Healthy structures have clearly defined boundaries and move freely under your fingers; they won't feel stuck to the tissue around them, or matted together (Figure 3).

Figure 3. Normal breast tissue.
- Continue to palpate in a straight line to the bottom of the breast (around the fifth rib). Move an inch over and palpate in a straight line up to the clavicle.
- Continue to examine the breast in the vertical strip pattern until finishing at the nipple line (Figure 3). Tell the patient, "You'll feel me pass over your nipple."
- Ask the patient to roll away from you, then remove the pillow. Place the pillow behind the patient's head, and ask the patient to roll back.
- Starting at the clavicle, continue the exam by reassessing the nipple line, continuing the vertical strip pattern until reaching the sternal border.
- Ask the patient to lower the arm to the side.
- Assess the infraclavicular nodes and tail of Spence.
- From the mid-clavicle, palpate directly below the clavicle to the edge of the shoulder.
- Palpate back a quarter of the way across the chest in a zigzag pattern, then to the distal border of the upper outer quadrant to finish checking the superior tail of Spence.
- Assess the inferior tail of Spence by placing three fingers under the pectoral muscle, so the tissue is resting on the pads of your fingers, and moving in a sideways windshield-wiper motion, as previously done to assess the axillary lymph nodes.
6. Optional: Information about the breast self-exam (BSE).
Data are lacking to support routine BSE, and it is not known to affect breast cancer outcomes. While the United States Preventative Services Task Force does not recommend it, the American Cancer Society and the American College of Obstetrics and Gynecology recommend breast self-awareness for all patients.
- While assessing the breast tissue, educate patients about breast self-awareness and encourage them to check their own natural structures, which have just been assessed as normal. Let patients know they can do monthly self-exams, like the clinical exam just performed, on the last day of the menstrual period, when there is least tenderness and fewest fibrocystic changes. Post-menopausal women can perform self-exams on the same date every month.
7. Conclude the exam
- Ask the patient to sit up and put the gown back on. Exit the room and allow the patient to dress. Return to discuss the findings and next steps.
Başvuru ve Özet
This video covers how to perform the clinical breast exam and how to visually inspect and examine breast tissue and associated lymph nodes. Before the breast exam is started, the examiner should establish the expectation that the patient can communicate questions and concerns during the visit. The patient should be asked to remove the gown only when necessary and reminded when to raise the gown during the exam. This minimizes feelings of vulnerability.
The clinician should begin with an overview of the exam and explain every step of the examination as they reach it. The examination starts with the visual inspection of the breast tissue, both still and in motion. Any potential signs of domestic or intimate partner violence should be noted. It should be remembered that some patients engage in rough sex, so bruising might not be indicative of violence. While proceeding through the exam, any findings must be documented. There is a wide range of healthy anatomy, and what is normal for one patient may be abnormal for another. For example, inverted nipples are perfectly normal for some patients; however, an inverted nipple may be concerning if it is only on one side or is a recent change.
The next step is the axillary lymph node exam, which is followed by systematic assessment of the breast tissue. The clinician should include the patient in the exam wherever possible and educate the patient so they are not alarmed by natural structures. If something concerning is found in one breast, a note of the location should be made and the other breast assessed to see if there are similar structures.
Beyond asking clarifying questions, the examiner should not discuss concerns or follow-up testing while the exam is ongoing. It is advised to wait until the patient is dressed; then, reenter the room to discuss concerns and next steps, as having those conversations while the patient is unclothed and vulnerable heightens anxiety. When an exam with no negative findings is finished, the clinician should always tell the patient "everything appears healthy and normal." This simple statement empowers patients to equate their body structures as normal.
Atla...
Bu koleksiyondaki videolar:

Now Playing
Comprehensive Breast Exam
Physical Examinations II
86.3K Görüntüleme Sayısı

Eye Exam
Physical Examinations II
76.4K Görüntüleme Sayısı

Ophthalmoscopic Examination
Physical Examinations II
67.1K Görüntüleme Sayısı

Ear Exam
Physical Examinations II
54.3K Görüntüleme Sayısı

Nose, Sinuses, Oral Cavity and Pharynx Exam
Physical Examinations II
65.1K Görüntüleme Sayısı

Thyroid Exam
Physical Examinations II
104.1K Görüntüleme Sayısı

Lymph Node Exam
Physical Examinations II
383.9K Görüntüleme Sayısı

Abdominal Exam I: Inspection and Auscultation
Physical Examinations II
201.4K Görüntüleme Sayısı

Abdominal Exam II: Percussion
Physical Examinations II
246.7K Görüntüleme Sayısı

Abdominal Exam III: Palpation
Physical Examinations II
137.9K Görüntüleme Sayısı

Abdominal Exam IV: Acute Abdominal Pain Assessment
Physical Examinations II
66.8K Görüntüleme Sayısı

Male Rectal Exam
Physical Examinations II
113.4K Görüntüleme Sayısı

Pelvic Exam I: Assessment of the External Genitalia
Physical Examinations II
302.7K Görüntüleme Sayısı

Pelvic Exam II: Speculum Exam
Physical Examinations II
149.0K Görüntüleme Sayısı

Pelvic Exam III: Bimanual and Rectovaginal Exam
Physical Examinations II
146.4K Görüntüleme Sayısı
JoVE Hakkında
Telif Hakkı © 2020 MyJove Corporation. Tüm hakları saklıdır