
Detecting Environmental Microorganisms with the Polymerase Chain Reaction and Gel Electrophoresis
Genel Bakış
Source: Laboratories of Dr. Ian Pepper and Dr. Charles Gerba - Arizona University
Demonstrating Author: Bradley Schmitz
Polymerase chain reaction (PCR) is a technique used to detect microorganisms that are present in soil, water, and atmospheric environments. By amplifying specific sections of DNA, PCR can facilitate the detection and identification of target microorganisms down to the species, strain, and serovar/pathovar level. The technique can also be utilized to characterize entire communities of microorganisms in samples.
The culturing of microorganisms in the laboratory using specialized growth media is a long-established technique and remains in use for the detection of microorganisms in environmental samples. Many microbes in the natural environment, while alive, maintain low levels of metabolic activity and/or doubling times and are thus referred to as viable but non-culturable (VBNC) organisms. The use of culture-based techniques alone cannot detect these microbes and, therefore, does not provide a thorough assessment of microbial populations in samples. The use of PCR allows for the detection of culturable microbes, VBNC organisms, and those that are no longer alive or active, as the amplification of genetic sequences does not generally require the pre-enrichment of microorganisms present in environmental samples. However, PCR cannot differentiate the aforementioned states of viability and activity. When combined with one or more culture-based techniques, the viability of certain subsets of microorganisms may still be determined.
İlkeler
The basic premise of PCR is to use repeated cycles of sequential temperature changes to achieve exponential amplification of DNA. The DNA synthesis is carried out by DNA polymerase enzymes that are obtained from bacteria living in hot springs, such as Thermus aquaticus (Taq). These polymerases are heat stable, allowing them to withstand the high temperatures used during PCR.
The target sequence, known as the amplicon, is amplified from the DNA template using two short stretches of nucleotides known as “primers”. Because of the high specificity of complementary nucleic acid binding, the primers allow for the targeted amplification of very specific sequences of interest. By designing primers that will only amplify a unique sequence (or a unique combination of sequences) from an organism of interest, PCR can be used to differentially detect for the presence of that organism’s DNA among all the genetic materials present in a complex environmental sample.
To perform PCR, a machine known as a thermocycler is used to automatically cycle through the different temperatures required for the reaction. Each cycle is divided into three phases. The first, known as “denaturation”, is usually set above 92 °C and lasts about 30 s. Denaturation is used to break DNA molecules into single strands, to permit the amplification reaction to proceed.
The second phase, “annealing”, is set 2-3 °C below the lower of the melting temperature of the two primers, usually between 50-65 °C, and also lasts about 30 s. Melting temperature is the temperature at which 50% of the double-stranded DNA have separated into single strands, and so the annealing step allows the primers to bind to their target sites in the DNA template.
The third phase of a PCR cycle is “elongation” or “extension”, when the DNA polymerase binds to the primer-template duplex and catalyzes synthesis of the product. Set at 72 °C for the Taq polymerase, the duration of this phase depends on the length of the amplicon, usually 30 s / 500 bp. After each cycle, the amplified DNA is once again denatured and serves as a new template, leading to an exponential increase in the amount of PCR products.
Once the reaction is complete, the PCR products can be resolved by size on a “gel” usually made of the polymer agarose, a process known as electrophoresis. An electric field is applied across the gel, and the negative charges in the backbone of DNA molecules cause them to migrate towards the positive end of the field. Generally speaking, linear DNA molecules that are larger will take longer to travel through the gel matrix.
Prosedür
1. Sample Collection
- Collect soil using an auger or shovel down to a determined depth. If collecting soil from the rhizosphere (the narrow region of soil surrounding and influenced by plant roots and their associated microbes), only collect directly from around the plant roots by hitting the soil off into a collection barrel.
- Collect water sample by dipping a sterile plastic bottle into the water while holding the end of the dipping stick.
2. Nucleic Acids Extraction and Preparation
- Collect organisms and viruses from the sample, and extract DNA and RNA from them. For details, please refer to the JoVE Science Education video on community nucleic acid extraction.
- Store the extracted DNA in labeled microfuge tubes. If the DNA needs to be stored overnight or for longer periods of time, freeze it at -20 °C, and thaw the tubes at room temperature when ready for use.
- If the genetic material to be assayed is RNA (whether it is the genome of RNA viruses, or the transcribed RNA of cellular organisms), perform reverse transcription (RT) on the sample to create complementary DNA (cDNA) before proceeding to PCR. For details, please refer to the JoVE Science Education video on RT-PCR.
3. Polymerase Chain Reaction
- Place the PCR enzyme (e.g., Taq polymerase) on ice and thaw the other reagents (PCR buffer, dNTPs, primers) inside a designated “clean” hood at room temperature. The enzyme is stored at -20 °C but never freezes. It is temperature sensitive, and so must be kept cool and its exposure to ambient temperature minimized
- Calculate the volume of each reagent needed to make a “master mix” of all reagents that are constant among all reactions (Table 1). Make sure to account for positive (e.g., a template known to contain the target region) and negative (e.g., no template) controls in the calculations. Add an additional 10% to the final volume to account for pipetting error. Primer volumes depend on assays for specific organisms; refer to published literature for the appropriate values.
- Using a low-binding microfuge tube, which minimizes the adhesion of reagent molecules to the plastic walls, add the calculated volumes of each reagent to assemble the master mix. Gently vortex and centrifuge each reagent before adding. Once the master mix is prepared, vortex to mix and collect by centrifugation
- Prepare 8-tube PCR strips. Designate a tube for each sample, including positive and negative controls
- Dispense the appropriate volume of PCR mixture into each tube of the strip
- Add the appropriate volume of DNA template from the samples, as well as 5 μL of the positive template and 5 μL of molecular grade water as negative control, into the respective PCR tubes.
- Place the cap securely on the 8-tube strip and centrifuge for a few seconds using a minicentrifuge
- Place the 8-tube strip in a thermocycler
- Set the appropriate PCR program to run on the thermocycler. A typical program consists of the following
- Denaturation at 94 °C for 3 min.
- 30–40 cycles of amplification: denaturation at 94 °C for 30 s, annealing at primer-specific temperature (usually between 50–60 °C) for 30 s, and extension at 72 °C for 30 s / 500 bp.
- Final extension at 72 °C for 7-10 min.
4. Agarose Gel Preparation
- Based on the desired gel volume and gel concentration (Table 2), weigh out the appropriate amount of agarose powder into a 125-mL Erlenmeyer flask.
- Add the appropriate volume of gel-running buffer into the flask, and swirl the flask by hand.
- Heat the buffer-agarose mixture in a microwave oven at high power for 1 min.
- Remove flask from the microwave and swirl by hand to make sure all the agarose has dissolved. If the agarose has not completely dissolved, repeat microwaving in 30-s increments.
- After tightly securing the cap onto the flask, cool it to 50 °C by rotating under running cold water.
- Add 1 μL of ethidium bromide (EtBr) to the agarose mixture using a micropippette designated for EtBr. EtBr is a dye that binds double-stranded nucleic acids and fluoresces orange when illuminated with UV light. Note that EtBr is potentially carcinogenic, so personal protective equipment (goggles, lab coat, EtBr resistant gloves) must be worn.
- Pour the molten gel into an electrophoresis gel casting tray. Make sure that no bubbles are trapped within the agarose. Place a comb into the gel and clamp securely. Wait approximately 20-30 min for the gel to solidify.
- Once the gel has solidified, remove the comb carefully without causing any tears in the gel. The comb creates wells in the gel for loading the samples.
5. Gel Electrophoresis
- Place the solidified agarose gel into the electrophoresis chamber.
- Add the appropriate running buffer into the chamber until the gel is barely submerged.
- Onto a piece of Parafilm, pipette spots of loading dye concentrate. Also include a DNA ladder of a suitable range for the expected sizes of the PCR products. Alternatively, use a fresh set of microfuge tubes, one for each sample.
- Once the PCR is completed, retrieve that 8-tube strip from the thermocycler, and briefly centrifuge to collect any condensates. Add an appropriate volume of DNA product to the loading dye and pipette up and down to mix. For example, 2 µL of 10x loading dye is mixed with 8 µL of sample to give a final volume of 10 µL, with the dye at 1x.
- Pipette each dye-sample mixture into the designated wells in the agarose gel, being careful not to puncture the wells.
- Connect the electrodes to the electrophoresis chamber. DNA is negatively charged, so it “runs” toward the positive electrode. Therefore, connect the positive electrode to the opposite side of the chamber, where the wells were loaded. Set the power supply to a voltage appropriate for the buffer system and size of the gel chamber, and set it to run. Small bubbles should be visible moving up the sides of the chamber if the electrophoresis is proceeding properly.
- Once the dye front has advanced far enough down the gel, turn off the power supply. Carefully transport the gel into the transilluminator or visual imager and turn on the UV light to visualize the DNA bands on the gel.
- Analyze the band size and positions on the gel. Compare the band positions of the samples to the positive control to determine if DNA from the organism of interest is present in the sample (Figure 1).
| Component | Volume per Tube (μL) | Volume for 5 tubes (μL) | Final Concentration |
| 10x Ex Taq buffer | 5.0 | 25 | 1x |
| 2.5 mM dNTPs | 4.0 | 20 | 0.2 mM |
| Forward Primer* | 2.0 | 10 | 400 nM |
| Reverse Primer* | 2.0 | 10 | 400 nM |
| Molecular H2O | 31.75 | 158.75 | - |
| Ex Taq | 0.25 | 1.25 | 2.5 U |
| PCR Mixture | 45 | 225 |
Table 1. Reagent volumes for PCR master mix. *Primer volumes vary depending on organism assay. Adjust the volume of molecular grade water to make the final volume 45 μL. Volumes of other components should not vary.
| Recommended % of Agarose | Optimum Resolution for Linear DNA Fragments (base pairs) |
| 0.5 | 1,000-30,000 |
| 0.7 | 800-12,000 |
| 1.0 | 500-10,000 |
| 1.2 | 400-7,000 |
| 1.5 | 200-3,000 |
| 2.0 | 50-2,00 |
Table 2. DNA fragment size ranges optimally resolved by different agarose gel percentages.
Sonuçlar
In Figure 1, the DNA ladder (lane 1) provides a reference for the size and approximate concentration for bands of the PCR products. The negative control (lane 2) does not contain any genetic material, while the positive control (lane 3) is amplified from templates known to contain the target DNA to indicate size and location of target bands. Samples 4, 6, 8, and 9 exhibit similar band pattern as the positive control, therefore indicating that these samples contain the target genetic material. It can be inferred that the organism is present in the environments from which these samples were obtained.
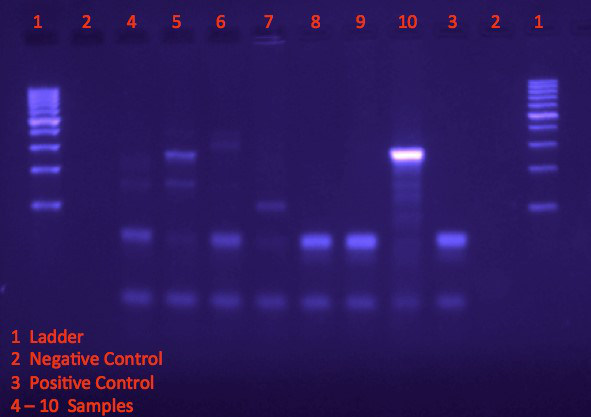
Figure 1. Visualizing bands on agarose gel following electrophoresis.
Başvuru ve Özet
PCR can be employed to quickly determine the presence or absence of pathogens in the environment. For example, primers specific to the brain-eating amoeba, Naegleria fowleri, will amplify DNA and produce strong bands on a gel if the organism is present in a sample. If a single organism is not the main interest, but rather genes associated with toxin production from a variety of organisms, PCR can also be used to determine the presence or absence of these specific genetic materials.
PCR can also be used as a confirmation procedure when analyzing environmental microbes in lab. If a culture method cannot differentiate between certain organisms that are present in an environmental sample, then PCR maybe used to specifically distinguish between the candidate microbes.
Conventional PCR can be modified in several ways for particular experimental purposes. PCR can be used to analyze single-stranded RNA templates by coupling to a reverse transcription step (RT-PCR). Beyond a determination of presence versus absence, quantitative PCR (qPCR) can measure the concentration for specific DNA of interest.
Atla...
Bu koleksiyondaki videolar:

Now Playing
Detecting Environmental Microorganisms with the Polymerase Chain Reaction and Gel Electrophoresis
Environmental Microbiology
44.6K Görüntüleme Sayısı

Determination of Moisture Content in Soil
Environmental Microbiology
359.3K Görüntüleme Sayısı

Aseptic Technique in Environmental Science
Environmental Microbiology
126.4K Görüntüleme Sayısı

Gram Staining of Bacteria from Environmental Sources
Environmental Microbiology
100.2K Görüntüleme Sayısı

Visualizing Soil Microorganisms via the Contact Slide Assay and Microscopy
Environmental Microbiology
42.2K Görüntüleme Sayısı

Filamentous Fungi
Environmental Microbiology
57.3K Görüntüleme Sayısı

Community DNA Extraction from Bacterial Colonies
Environmental Microbiology
28.8K Görüntüleme Sayısı

RNA Analysis of Environmental Samples Using RT-PCR
Environmental Microbiology
40.4K Görüntüleme Sayısı

Quantifying Environmental Microorganisms and Viruses Using qPCR
Environmental Microbiology
47.8K Görüntüleme Sayısı

Water Quality Analysis via Indicator Organisms
Environmental Microbiology
29.5K Görüntüleme Sayısı

Isolation of Fecal Bacteria from Water Samples by Filtration
Environmental Microbiology
39.3K Görüntüleme Sayısı

Detection of Bacteriophages in Environmental Samples
Environmental Microbiology
40.7K Görüntüleme Sayısı

Culturing and Enumerating Bacteria from Soil Samples
Environmental Microbiology
184.3K Görüntüleme Sayısı

Bacterial Growth Curve Analysis and its Environmental Applications
Environmental Microbiology
295.9K Görüntüleme Sayısı

Algae Enumeration via Culturable Methodology
Environmental Microbiology
13.8K Görüntüleme Sayısı
JoVE Hakkında
Telif Hakkı © 2020 MyJove Corporation. Tüm hakları saklıdır