
X-ray Fluorescence (XRF)
Przegląd
Source: Laboratory of Dr. Lydia Finney — Argonne National Laboratory
X-ray fluorescence is an induced, emitted radiation that can be used to generate spectroscopic information. X-ray fluorescence microscopy is a non-destructive imaging technique that uses the induced fluorescence emission of metals to identify and quantify their spatial distribution.
Zasady
First, samples must be prepared that are thin, flat, and dry (unless a special cryogenic stage is available for the microscope). Next, a focused monochromatic X-ray beam is raster-scanned across the sample. The X-ray beam overcomes the binding energy of some of the inner shell electrons to the metal atoms, and when outer shell electrons fall into those vacancies, a second X-ray is emitted by the sample. At every point in this raster-scan, an X-ray fluorescence emission spectrum is collected by the detector.
In this spectrum, the wavelength and intensity of all the X-rays emitted by the sample is recorded. Based on the characteristic energy (due to the spacing of the orbitals in the atom) of the emitted fluorescence and the characteristic relative intensity of Kα and Kβ peaks (for example, which are both known), the emission spectrum can be used to determine both the identity of the metals present and the quantity.
This video will explain the process of preparing a thin, dry sample of adherent cells suitable for fluorescence imaging. The process of scanning the samples will be explained briefly, and an example image described.
Procedura
1. Preparing the Silicon Nitride Windows
- Use reverse tweezers to pick up a window (silicon nitride windows will shatter if dropped).
- Place window onto a glass slide, flat side up.
- Adhere small pieces of Scotch tape to the sides of the window, and use these to adhere the windows to the bottom of the culture dish.
- Sterilize the windows in culture dishes with UV radiation. This can be accomplished with the auto-crosslink setting on a UV-crosslinking cabinet, followed by further UV irradiation under the UV lamp in the laminar flow hood for about 1 h.
2. Plating the Cells onto the Sterilized Silicon Nitride Windows
- Hold the dish with it tilted at about a 45° angle.
- Add media by pipetting towards the side of the dish and slowly relieve the tilt angle to coat the window with media.
- Add cells to the culture dish, in the same manner, and incubate.
- Observe the cells occasionally using a light microscope to determine when they are ready to use.
3. Fixation and Drying of Cells
- In a laminar flow hood, remove the media by gentle aspiration while tilting the dish as described above.
- Add PBS, pipetting towards the side of the dish while holding it at angle. Slowly relieve the tilt angle to coat the window with PBS.
- Remove the PBS with gentle aspiration.
- Pipetting towards the side of the dish, and holding it at an angle, add 4% PFA/PBS, pH 7 to cover the cells. Keep in this solution for 20 min at room temperature.
- Remove the PFA/PBS mixture, and dispose as hazardous material.
- Add PBS, pipetting as described above.
- Repeat steps 3.5 and 3.6 twice.
- Remove the PBS by gentle aspiration.
- Add 20 mM PIPES, 200 mM sucrose, pH 7.
- Remove the PIPES/sucrose by gentle aspiration.
- Repeat steps 2.8 and 2.9 twice.
- Quickly blot the edges and back indentation of the window with a Kimwipe, then set the window on a clean surface, such as a rubber grid mat, to dry.
4. X-Ray Fluorescence Imaging of Cells
- Once the sample is dry, verify the presence of cells on the windows using a light microscope.
- Use nail polish to secure the windows to an aluminum holder provided by the beamline.
- Insert the aluminum holder into a kinematic mount, and then place it into position at the focal point of the optics in the X-ray microscope, and at an angle of about 45° to the incident X-ray beam, mounted to the sample nanopositioning stages.
- Exit the X-ray microscope instrument area (usually a hutch made of lead walls), and open the shutter. Conduct the remaining steps remotely.
- Using either a zone plate, or Kirkpatrick-Baez mirrors, focus the monochromatic X-ray beam (usually 10 keV in energy) down to a sub-micron spot size.
- Using the nanopositioning sample stages, and viewing the position of the X-ray beam on the sample with a pre-calibrated downstream scintillator camera, determine the appropriate width and height of the raster scan in order to capture data of the sample.
- With the wavelength-dispersive silicon drift detector at 90° to the incident beam, and about 3 mm or less from the sample, collect a test spectrum with a dwell time of 1–2 sec.
- Viewing the test spectrum, choose an appropriate dwell time for the scan, to provide sufficient signal-to-noise for the elements of interest.
- Choose an appropriate resolution for the scan, one which is not significantly smaller than the spot size of the beam on the sample, nor larger than the features of interest in the sample.
- Program the scan into the scanning software, and collect the image.
Wyniki
The X-ray fluorescence map of an adherent cell is shown in Figure 1. Each panel shows the distribution of a particular element (e.g., copper, iron, zinc, etc) over the cell. The panel labeled 's_a' shows the absorption of X-rays.
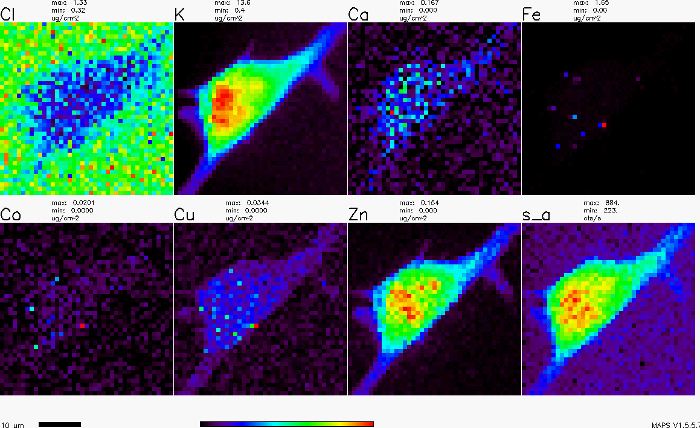
Figure 1. X-ray fluorescence map of an adherent cell. Please click here to view a larger version of this figure.
Wniosek i Podsumowanie
X-ray fluorescence imaging can be a useful tool in many fields including geosciences, forensic science, materials science, biology, and even in studying our cultural heritage. In materials science, it can help find defects in chips and catalysts made with metals. In cultural heritage work, it has been used to identify poisonous metals in the hair of famous dead people (e.g., Beethoven), and to identify the source of paints used in art. In biology, it is used to study the natural metals that perform important biochemistry. In geosciences, it is often used to study events chronicled in the rock record. Two particular characteristics that make X-ray fluorescence imaging useful in so many fields are 1) its non-destructive, so many items that are rare, or of high value can be imaged, and 2) while the sample preparation described here for cells is complex — because the cells must be dried-for many materials such as rocks, art, or other items, there is very little sample preparation required, other than it should be flat and free of dust. Although a synchrotron is required which is best accessed through collaboration with scientists at these facilities, the technique can be very accessible.
Tagi
Przejdź do...
Filmy z tej kolekcji:

Now Playing
X-ray Fluorescence (XRF)
Analytical Chemistry
25.4K Wyświetleń

Sample Preparation for Analytical Characterization
Analytical Chemistry
84.6K Wyświetleń

Internal Standards
Analytical Chemistry
204.7K Wyświetleń

Method of Standard Addition
Analytical Chemistry
319.8K Wyświetleń

Calibration Curves
Analytical Chemistry
796.2K Wyświetleń

Ultraviolet-Visible (UV-Vis) Spectroscopy
Analytical Chemistry
623.0K Wyświetleń

Raman Spectroscopy for Chemical Analysis
Analytical Chemistry
51.2K Wyświetleń

Gas Chromatography (GC) with Flame-Ionization Detection
Analytical Chemistry
281.8K Wyświetleń

High-Performance Liquid Chromatography (HPLC)
Analytical Chemistry
384.1K Wyświetleń

Ion-Exchange Chromatography
Analytical Chemistry
264.4K Wyświetleń

Capillary Electrophoresis (CE)
Analytical Chemistry
93.7K Wyświetleń

Introduction to Mass Spectrometry
Analytical Chemistry
112.2K Wyświetleń

Scanning Electron Microscopy (SEM)
Analytical Chemistry
87.1K Wyświetleń

Electrochemical Measurements of Supported Catalysts Using a Potentiostat/Galvanostat
Analytical Chemistry
51.3K Wyświetleń

Cyclic Voltammetry (CV)
Analytical Chemistry
125.0K Wyświetleń
Copyright © 2025 MyJoVE Corporation. Wszelkie prawa zastrzeżone